Roof repair is an important but often unpleasant task. Nobody wants to be climbing up and down a ladder in the middle of a storm, but that’s what you might have to do if your roof is damaged.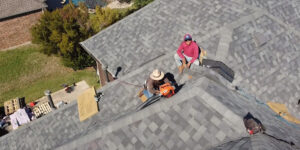
Getting your roof repaired quickly is essential to avoiding major problems later. This is especially true if you have a leak around a chimney or a roof vent. For professional help, contact A. Parker Contracting now!
A broken shingle is not only unsightly, it’s also a roof leak waiting to happen. But repair is relatively easy and inexpensive if you can find matching replacement shingles. Just make sure you’re not afraid of heights and that the weather is moderate (too cold, and the shingles may crack, too hot, and they will crumble). You’ll need a flat pry bar, asphalt roofing cement, and replacement shingles.
First, get up into the attic or crawl space and look around for a good view of the damaged area. Then take some high-resolution pictures — you will need them for the next step.
When you’re back at home, open the photos in a slideshow and zoom in to see any other damage or potential leak areas. You’ll want to compare the photos with your roof plan so you can understand where you are and what needs to be done.
Loose shingles are not always easy to spot, and sometimes you will need to inspect the whole roof to be sure there isn’t something else lurking that you’re missing. A thorough inspection will be worth the time, as it will help you determine if a few small repairs are all your roof needs or whether it’s in need of a complete reroof.
Once you know what the problem is, climb up onto the roof (use a harness for safety) and locate the broken shingle. Start by loosening the tabs around it by sliding a flat pry bar underneath the shingle, then gently prying up each adjacent shingle until you can pull out the old one. Be careful not to break or tear the shingles below, and don’t remove any of the nails that are holding it in place, since those need to remain in place until you can replace them.
Before you put in the new shingle, cut away any loose or brittle roof cement under it with a utility knife and scrape the opening clean. Once the gap is clear, slide the new shingle into place, aligning its front edge with the surrounding shingles and the back edge under the shingles in the row above it. Secure the shingle with a nail in each of the four nails at the base, using galvanized roofing nails so they can stand up to rain and sun exposure.
Filling Holes
In many cases, it will be necessary to get up on the roof in order to patch holes or leaks. This can be dangerous, so you should always use a ladder that is completely secure. It is also a good idea to have another person present when you climb on the roof. They can help you spot any areas of moisture or damage, and also help you if you are not sure what to look for.
The best way to patch a hole in your roof is to remove the old roofing sheet and replace it. This will give you a more durable and long-lasting solution than a sealant, which may need to be renewed from time to time. However, there are some situations when removing the roofing will not be possible.
One example is when a shingle gets pulled up and leaves a nail hole. In this case, a roofer will have to break the seal on the shingle, lift it up, remove the nail, and then reseal the shingle. They will also have to check the surrounding shingles and make sure they are still in place.
Another type of hole that can be filled is when a squirrel or other animal creates a gap in the roof. This is a serious problem and should be dealt with immediately. If animals are allowed to enter a home, they can cause damage to insulation and other areas of the home. They may also carry ticks, fleas, and other parasites into the home.
If you discover a hole in the roof, it is important to call a wildlife removal service. The company can help to safely trap and humanely release the animals. You should also consider calling a pest control company to spray for bugs and other insects. If they are allowed to remain in your house, they will continue to damage the insulation and other parts of the home.
Inspect the interior of your home for any signs of water stains or mold. It is also a good idea to check for damage around chimneys, vents, and other penetrations. If you are able to access the attic, look for damaged shingles, rust on metal flashing, or any other signs of moisture or wear.
Flashing Replacement
The metal flashing in a roof is an important part of the structure, as it protects areas where the roofing meets walls, valleys, and obstructions like chimneys, dormers, and vent pipes. Flashing is generally made of a durable metal, such as aluminum or stainless steel, although copper is also sometimes used for decorative reasons. While roof flashing is more resilient than shingles and other elements of the roofing system, it can still suffer damage over time. Having your flashing inspected on a regular basis is the best way to keep it from becoming damaged.
If you do notice signs of flashing damage, such as small holes or corroded spots, it’s essential to take care of these problems right away. If left unattended, these small leaks can lead to larger water damage issues throughout the home. A roofing contractor will be able to repair or replace the flashing in these areas as needed, and make sure it’s properly fitted and secured to the roof.
Roof flashing is usually installed in multiple pieces to cover the various areas of a roof where it meets walls or other structures. Typically, you’ll have step flashing to protect the area where the roof face meets a wall, along with counter flashing and apron flashing. Each piece of flashing is built to protect specific points of water intrusion and ensure a comprehensive waterproof solution.
To install new flashing, you’ll first need to remove the shingles around the area that needs work. This is a labor-intensive task that should be done by a professional for the safest and most effective results. After the old flashing is removed, you can use caulking designed for roofing to seal in the new flashing.
If you’re replacing flashing at a pipe penetration, it’s important to chamfer the open end of the pipe and clean off any dirt or debris. Then you can slide the new flashing over the chamfered edge, and then nail it into place with roofing nails. When you’re doing this, be careful not to yank the flashing out of the mortar joint; you may need to gently loosen or pull up the mortar and then reinstall it.
Underlayment Replacement
Many homeowners think they can simply repair a damaged roof and save the expense of replacement. While this can sometimes be a viable option, it’s not always possible. Sometimes the damage is so extensive that a full roof replacement is the only way to protect your home. In such cases, you’ll need to replace the entire underlayment on your roof, as well as the tiles.
Underlayment is the layer of water resistant material that sits beneath your roof deck and shingles or other roof covering. It helps channel water off the roof and into the gutters, protecting your home from moisture and mold problems. It also helps keep your shingles or other roofing materials from becoming brittle or torn off by wind-driven rain.
The underlayment is installed before the primary roof-covering material is put down on the roof. Depending on the slope of the roof and the climate, there are several types of underlayment to choose from. These include felt, synthetic materials and rubberized asphalt. Felt is the traditional underlayment used in older homes. It is not waterproof, but it is water-resistant and provides a more affordable option for low-budget projects. It must be used above a properly ventilated attic space, and staples should not be used on this type of underlayment. It also doesn’t last as long as other types of underlayment, such as rubberized asphalt or synthetic materials.
Synthetic underlayments are newer and offer better protection than felt. They are lighter, and you often need fewer rolls than felt to cover the whole roof. They also provide an extra layer of protection against moisture and mold, and they are more durable. These materials can even self-seal around nails and staples. They are generally more expensive than felt or rubberized asphalt, but they last longer.
In some cases, you’ll need to replace the underlayment even if your roof tiles are still in good condition. This may be because the underlayment is old and worn out, or it may have been compromised by moisture or fire. For example, if your roof was built with pine or fir boards as the sheathing, the resin pockets in these woods can react chemically with some types of roof-covering materials and cause them to fail prematurely.