Home » Articles posted by David Federico
Author Archives: David Federico
HVAC Systems
HVAC systems control air temperature, humidity and circulation in conditioned spaces. In commercial buildings, efficient air distribution enhances occupant comfort and productivity; in homes, it ensures healthy indoor air quality.
The most common hvac designs split equipment between the home and outdoor unit, keeping noisy components away from living areas. Other arrangements include packaged units that cram all components into one outdoor cabinet. Contact Ausco Air Heating & Air Conditioning for professional help.
HVAC systems make a big difference in both comfort and air quality in homes and commercial buildings. Basically, they take in air, heat it or cool it as necessary, and then redirect the air back into the space to create positive pressure and comfortable temperatures. They also filter out contaminants like smoke, dust, dander, and bacteria to keep your breathing healthy and your space cleaner.
An HVAC system is made up of various components that work together to regulate indoor temperature, humidity, and air quality. Each of these functions is important to your home, so it’s helpful to understand how they all work.
The heating component of an HVAC system is the furnace, which uses fuel (gas or electricity) to ignite a flame that burns with oxygen to produce combustion gas. The blower then pushes this combustion gas through ductwork and out of vents to warm your house. The laws of thermodynamics dictate that the warmer the combustion gas becomes, the more it will expand and disperse its heat. This is why the ductwork is designed to hold the combustion heat until it can spread evenly throughout your home through convection.
Modern HVAC systems are designed to control moisture as well, as it can have a negative impact on indoor air quality and comfort. When the evaporator coil in an air conditioner comes into contact with the warm, humid air in your home, it causes water vapor to condense and become liquid. The liquid then moves to the compressor, where it is pressurized and turned into a vapor again. This vapor then expels heat into the air, cooling your home and reducing its humidity.
An HVAC system’s ability to control humidity is a function of how well its various components are maintained. Regular maintenance is a must for optimal performance, and it should be done before the start of the heating season in late summer or early fall and again before the cooling season begins in late winter or early spring. Routine maintenance tasks include checking thermostats, cleaning ductwork and vents, replacing filters, lubricating moving parts, testing refrigerant levels, and clearing any obstructions in the evaporator coil.
Cooling
The cooling part of your HVAC system takes some of the heat it gathered while heating and expels it outdoors, thus cooling the air inside your home. In a typical configuration, the evaporator coil in your air conditioning unit absorbs water vapor from the cooled air that passes over it and then pushes it back into your home, where it evaporates again. This process lowers the humidity in your house, which helps with breathing and reduces the risk of mold.
A good quality air conditioner has a SEER rating that tells you how efficient it is; the higher the number, the more efficient it is. However, you should also consider other aspects of your AC unit. For instance, filters need to be regularly cleaned or replaced to prevent dirt and other impurities from clogging the ductwork and affecting the efficiency of the system.
Another type of HVAC unit that is gaining popularity is a boiler and heat pump. Unlike a furnace, a boiler doesn’t heat your home with air; it heats your home using steam or hot water. This can be more energy efficient than a furnace, especially if you have an older home that isn’t well-insulated.
The heat pump is similar to the air conditioner, but it can handle both cooling and heating, which means you don’t need a separate unit for each. This type of HVAC system is often used in new homes, or in old homes that have been modified to accommodate a modern AC unit.
If your HVAC is older and has a lower SEER rating than it should, replacing it with a more efficient model can help you save on utility bills. You should also check that your ductwork is properly insulated to keep the cold from leaking out and warm air escaping.
Some homeowners confuse the terms HVAC and air conditioning, but they are different things. A HVAC system contains both ventilation and air conditioning units, and it’s essential for moving fresh air around your home or building.
Ventilation
Ventilation is one of the most important aspects of HVAC because it ensures that conditioned air remains fresh and clean. It also balances indoor and outdoor air quality. Ventilation systems typically consist of ductwork that serves as a network of channels that distribute conditioned air throughout a home or building, and air filters designed to remove dust, dirt, allergens and other pollutants from the circulating air.
A well-functioning ventilation system also removes moisture, carbon dioxide and other gasses that can affect human health. This helps maintain a healthy environment that promotes better sleep, reduces the risk of disease, and increases mental alertness.
There are several different types of HVAC systems, depending on the specific needs and budget of the homeowner or business owner. The most common type is a split system, which consists of an indoor unit that contains the evaporator coil and blower assembly, and an outdoor unit that houses the compressor and condenser coil. This is the most popular option because it is versatile, economical and efficient.
When installing an HVAC system, it is essential to consider the square footage of the space and climate conditions to determine the size of the system that is needed. This will ensure that the system isn’t too big or too small for the job at hand. It is also important to select an HVAC system that has an energy efficiency rating that will help decrease operating costs and reduce the impact on the environment.
In a home or building without an existing HVAC system, the ventilation process can be initiated by opening windows and doors to provide natural ventilation. In addition, there are various fans and other equipment that can be used to assist with this. However, this method may not be sufficient for many buildings, especially when outdoor temperatures are extreme or when new construction is taking place and the windows must remain closed.
An HVAC system is the best way to introduce fresh air into a building, while ensuring that it stays warm or cool and is free of contaminants and pollutants. It can also help to minimise the presence of formaldehyde and other harmful chemicals that are released from some new building materials, paints and plasterboard products.
Why Insulation Removal Is Necessary
Insulation Removal Perth is not a DIY project for most homeowners. Risks like rodent infestation and contaminated insulation necessitate professional assistance.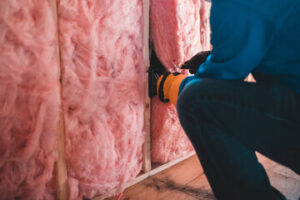
Proper identification and preparation guide the selection of tools, equipment and techniques for insulation removal. This includes a stud finder, gloves, coveralls and a respirator to minimize inhalation of fibers and dust.
Insulation is a critical part of your home, keeping it warm in winter and cool in summer. However, insulation can become compromised due to moisture, aging, pest infestation, and more. In these situations, insulation removal is necessary to ensure a clean and safe home environment. The process involves sanitizing the attic and walls, and removing and replacing old insulation. This can help you save money on energy bills and enjoy a more comfortable home environment.
Whether you’re tackling the job yourself or hiring professionals, you can better prepare for insulation removal by knowing what to expect. This blog explores the steps of this process, the safety precautions you should take, and how to avoid common mistakes.
Before you begin, you’ll want to clear out your attic space of any items and make sure it is accessible to all workers. This will help you move more quickly and prevent any damage or contamination of items. You should also wear proper protective gear. This includes a pair of rubber-coated gloves, a respirator, and eye protection to guard against inhaling dust, debris, and potential mold spores. You’ll also need to wear long sleeves and pants to reduce the risk of skin contact with the irritants.
Once you’ve cleared the attic, it’s time to set up your equipment. Ideally, you’ll have a commercial vacuum or a HEPA-filtered shop vac with the capacity to handle large volumes of blown-in insulation. You’ll also need a rake and a dustpan to gather loose insulation and transfer it into garbage bags.
Finally, you’ll need to have a sturdy ladder and a pair of long pants or coveralls. These will protect you from snags and tears in the attic. Once you’re ready to begin, turn off the power to any electrical systems in the attic and disconnect any wires. Working around live wires can cause serious injuries if you mishandle them or cut them accidentally.
Once the insulation has been removed, it should be disposed of in accordance with local regulations. It’s important to use a facility that specializes in handling hazardous materials to minimize environmental contamination.
Removal
If you’re experiencing cold floors or walls, sky-high energy bills, or signs of pest infestation or mold growth, it may be time to remove your attic insulation. Although you can do this yourself, it’s best to hire professionals to ensure your safety and avoid costly mistakes.
Before you start removing your old insulation, make sure to clear any objects or boxes from the attic space. This will help you create more space and prevent your items from being contaminated or damaged during the process.
It’s also important to prepare yourself by gathering the proper equipment. A specialized insulation removal vacuum, a rake to gather loose insulation into piles, and sealed bags to contain the debris are essential tools for this project. Additionally, you’ll want to have a ladder and flashlight for visibility. Lastly, it’s recommended to wear gloves, a mask, and goggles to avoid direct contact or inhalation of potentially harmful contaminants.
The removal process starts with thoroughly inspecting your attic for signs of mold, pests, and water damage. It’s crucial to address these issues to prevent structural problems, improve your home’s air quality, and save on energy costs.
Old or damaged insulation can trap harmful allergens, contaminate the air inside your home, and cause respiratory problems. Replacing this material will eliminate these pollutants and allow fresh, healthy air to circulate throughout your home. It can also help reduce your energy costs by eliminating materials that are no longer effective at regulating the temperature in your home.
Insulation in walls can degrade or become infested with pests over time, leading to leaks and reduced energy efficiency. The removal process involves carefully opening up wall sections, sanitizing the area, and decontaminating to prepare it for new insulation. Some types of insulation, such as vermiculite, may contain asbestos and require extra care when removing and replacing. Once the attic and walls are free of contaminating materials, it’s ready for new insulation that will improve your home’s comfort and energy efficiency.
Disposal
Insulation is a critical part of keeping your home healthy, comfortable and energy efficient. However, it can only last so long before it wears out and needs to be replaced. Old and outdated insulation is more likely to let air leak through, raising heating and cooling costs. Additionally, it may harbor allergens and toxins that can be harmful to your health.
There are several signs that your existing insulation is unsuitable for continued use, including pest infestations, moisture stains or unpleasant odors. If you suspect that your attic space is affected, a professional inspector can help you determine the extent of the problem.
Once the inspection is complete, you can start preparing for insulation removal. The first step is to clear out the attic space and remove any furniture or boxes that are in the way. This will allow you to move more easily and protect your belongings from contamination or damage during the removal process.
You will also want to prepare the attic space for a more thorough clean up once the insulation is removed. This will include sanitizing the area, removing any remaining debris and sealing any entry points used by rodents, birds or squirrels. A vacuum with a HEPA filter can be helpful to get into corners and hard-to-reach areas. You’ll want to have plenty of garbage bags to collect the rolled up batt insulation for disposal.
If the inspection results in an indication that your old insulation contains asbestos, you will need to contact a professional for safe removal and disposal. Asbestos is a dangerous material that must be handled by a certified technician to prevent contamination or exposure.
Hiring a professional to remove your attic insulation can save you time, money and effort. They can inspect the existing insulation for contaminants and use specialized tools to remove it quickly and efficiently. They can even install a new, more effective replacement for your home that will reduce energy bills and improve indoor air quality. Additionally, installing new insulation will raise the resale value of your home and attract eco-conscious buyers.
Assessment
Insulation plays an important role in keeping homes comfortable and energy-efficient, but it may need to be removed or replaced due to damage, age, or the desire to upgrade to newer insulation materials. Understanding the process of insulation removal and taking proper precautions is essential for ensuring that it goes smoothly and safely.
The assessment process begins by identifying the type and condition of the insulation and determining any potential hazards. Then, a plan is created for the proper extraction method to be used. This may involve hand or machine removal, depending on the situation and attic size.
Professionals use specialized tools and techniques to carefully remove the old insulation while minimizing disruptions and safety risks. This is particularly important for older, hazardous materials such as asbestos or vermiculite that may be present in the home’s existing insulation. Preparation is also a key aspect of this stage, as workers must prepare the work area and wear appropriate protective gear.
Once the insulation has been removed, it is disposed of in compliance with local regulations and environmental guidelines. This prevents contamination of the environment and ensures that any harmful elements in the insulation don’t reach the water supply. It is also critical to properly dry and dehumidify the workspace after removing insulation, especially in cases of water damage or mold.
There are a number of signs that it’s time to remove and replace insulation, including high energy bills, uneven temperature fluctuations throughout the house, or noticeable damage. If the insulation is visibly moldy, water-stained, or contaminated with rodent droppings or urine, it needs to be removed and replaced immediately.
In addition, if there are any significant leaks in the roof or walls, they should be repaired before replacing the insulation to avoid exposing residents to dangerous contaminants. It’s also crucial to consider air sealing the home before installing the new insulation, so that it is as effective as possible.
How Bathroom Remodeling Can Increase Your Home’s Value
If you’re planning to upgrade your bathroom, you’ll likely want to make some changes. Depending on the scope of your project, these can be surface updates or gut and replace remodels.
Regardless of your project, be sure to prepare the space for remodeling by clearing out everything and decluttering. This will save you time and money and avoid unforeseen issues during the remodel. Contact Bathroom Remodeling Jacksonville FL for professional help.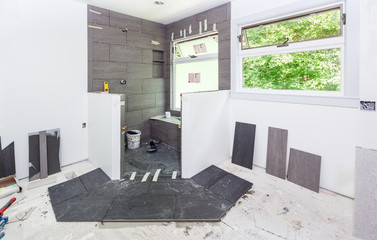
When you think about a bathroom remodel, your mind might jump to an overhaul of the entire space that changes its layout, size, and design. However, that type of renovation isn’t the only way to refresh your bathroom and make it feel more current.
Changing the look of your bathroom can be as simple as adding some new elements or refreshing the existing ones. For example, replacing the vanity top, shower head, or towel bars can give your bathroom a modern look and improve functionality. You can also add a bold accent wall or choose moisture-resistant wallpaper to introduce some color and pattern to the room.
Other small but impactful changes you can make include updating the lighting, mirrors, and flooring. New hardware like faucets, drawer pulls, and towel bars can have a big effect as well. Choosing pieces with a similar finish can help ensure the look is cohesive and streamlined, or you can opt for mixed metals to create a more modern aesthetic. Similarly, swapping out old toilets and bathtubs for showers and freestanding tubs can open up the floorplan while introducing a more luxurious feel.
Natural materials like wood and stone are a great addition to any bathroom. They can add warmth and texture to the space, which can be especially beneficial for smaller bathrooms that may feel cramped or claustrophobic. Incorporate these materials in the form of countertops, shelving, or a feature wall to create visual interest and a spa-like atmosphere.
A fresh coat of paint can go a long way in terms of revitalizing the look of your bathroom. Opt for soft and soothing colors that evoke a sense of calm and relaxation. For a dramatic change, opt for a bold shade on one accent wall.
Adding more storage and organization to your bathroom is an easy and affordable way to boost its appeal. Consider adding a built-in linen closet or an island for extra counter and storage space. You can also install floating shelves to display your favorite décor and create a more open look. Adding a pop of color with decorative vases or baskets can also give your bathroom a finished and polished appearance.
Add Functionality
Whether your bathroom is an oasis for relaxation or the place where you prep for your day, it’s important to make sure it meets your functional needs. By upgrading the layout or adding storage solutions, you can ensure your space is more comfortable and efficient. Additionally, incorporating high-quality materials can enhance the look and durability of your bathroom. This makes your bathroom stand out to future buyers and increases its value.
One of the biggest reasons to remodel your bathroom is to address issues like cramped spaces or a disorganized layout. During a renovation, professionals can reposition plumbing fixtures to optimize the layout and improve the functionality of your bathroom. This may include moving your sink, toilet, or shower to a different location within the room or adding an extra fixture where necessary.
Another way to improve the functionality of your bathroom is by installing energy-efficient upgrades. By switching to low-flow toilets, showerheads, and faucets, you can reduce your home’s water and energy consumption, which in turn saves money and helps the environment. Additionally, by replacing your incandescent bulbs with LED lighting, you can lower your electricity bills.
A professional bathroom remodel can add a touch of luxury to your space by utilizing durable, long-lasting materials like natural stone countertops and high-end vanities. Additionally, incorporating smart technology features can elevate the functionality of your bathroom while enhancing its aesthetic and appeal to future buyers.
While some homeowners choose to remodel their bathrooms on a DIY basis, hiring professional contractors can make the process much easier and more seamless. A reputable remodeling company can handle all aspects of the project, including design consultations and inspections, and will provide regular updates on progress to ensure transparency and trust.
Remodeling a bathroom can take anywhere from four to eight weeks, depending on the size of your space and the scope of the project. Understanding what factors into the duration of your remodel can help you plan better and avoid any delays. For example, larger bathrooms usually require more work than smaller ones, and if you use materials like imported ceramic tiles that need longer drying times, this can also extend your project’s timeline.
Make the Space More Comfortable
Bathrooms are more than just a place to get clean; they should be comfortable spaces where you can unwind after a long day. Remodeling the space to better suit your needs and improve functionality can make the room more enjoyable. Installing features like radiant floor heating or a jacuzzi tub can create an experience that is relaxing and luxurious.
Another way to make the space more comfortable is to add extra storage solutions to help keep the area free of clutter. Adding custom cabinetry or shelving can give you the extra space you need to store things like towels, toiletries, and cleaning supplies. This can help keep the room organized and reduce the amount of time you spend looking for a specific item.
A bathroom is also a space that can be made more comfortable by making the proper adjustments to lighting. Adding new lighting fixtures can make the space feel brighter and larger. Choosing light colors for the walls and ceiling can also work to open up the room.
One of the most important considerations when considering bathroom remodeling is how it will affect your budget. There are many factors that can influence the cost of a bathroom renovation and the best way to determine how much you should spend is to consult a professional. The contractor will be able to assess the current state of your bathroom and provide you with a detailed breakdown of all the costs associated with the project. Having this information will help you make the right decisions when selecting fixtures and materials.
It is always a good idea to set aside 5-10% of your budget for any unforeseen circumstances that may arise during the course of the renovation. Unforeseen expenses can include unexpected damage, changes to your initial design plan, or the need to buy more materials than originally anticipated. This additional money will help ensure that you don’t go over your original budget.
Remodeling the bathroom is a big project that can take between four and eight weeks. It is important to prepare for the project ahead of time by knowing how long it will take and having a clear vision of what you want your bathroom to look like.
Increase Home Value
Remodeling your bathroom can increase the value of your home. However, you’ll want to make sure your renovations are appropriate for the market and reflect current trends. For instance, a trendy shiplap bathroom may only add value if it’s done well and is an addition that will appeal to a wide range of buyers.
A full bathroom addition is also a way to increase your home’s value, but it is a more extensive project than a minor remodeling. It can cost tens of thousands of dollars, so you’ll want to consider the return you would see on the investment when considering a new addition to your bathroom.
The most popular upgrades include a spa-like tub, updated tile and double vanities. These can easily add value to your home, and they also improve the livability of your space.
Smaller upgrades can also boost your home’s value, including a fresh coat of paint and a new vanity light. These improvements can quickly transform the look and feel of your bathroom and are less expensive than major upgrades.
When choosing colors for your bathroom, keep in mind that neutral shades are most appealing to potential buyers. You can still add your own personal touch, but choose a palette that will be easy to live with and match most other styles of decor.
Other additions, like grab bars and hands-free faucets, can also add value by making your bathroom safer for people of all ages and abilities. This type of safety-focused remodeling can help elderly or disabled homeowners remain in their homes for as long as possible and may reduce the need for future healthcare costs.
As with any remodeling project, there are a few factors that can influence how long your bathroom remodel will take. The planning and design phase will generally take two to four weeks, followed by demolition (2+ days), construction work (1 week+) and installation of fixtures (1-4 days). This timeline can be shortened or extended depending on the complexity of your remodel and any unforeseen issues that might arise. To ensure your bathroom remodel is completed on time and on budget, it’s important to plan ahead and hire the right contractor.
How to Choose the Best Piano Movers
Whether it’s an upright or grand piano, moving this instrument requires expert handling and careful planning. Find a local piano mover to ensure that your precious investment is transported safely. Contact Piano Movers North Charleston SC for professional help.
While it’s possible to move a piano on your own, you’ll want to make sure that the movers you choose have special training and equipment for this delicate job. Look for these key qualities:
Choosing the best piano movers is an essential part of ensuring that your precious instrument is moved safely to its new location. This is a specialized service and requires expertise that only a professional mover can offer. It is important to ask your potential piano movers how long they have been in business and how many pianos they typically move each year. A company with extensive experience is likely to have encountered and successfully handled many challenges that can arise during a piano move.
In addition to experience, it is also important to consider the knowledge and training that your piano movers possess. They should have a deep understanding of the intricacies of moving a piano, including how to maneuver it through tight spaces and doorways. They should also be familiar with the different types of pianos and their dimensions. Moreover, they should be able to tell you how they will take care of your piano during the move and prevent any damage from occurring.
When choosing a Piano Mover, make sure that they are licensed and insured. This will provide you with peace of mind knowing that your possessions are in good hands. In addition, it is a good idea to look for customer reviews and references on online platforms like uShip. These reviews will give you a better picture of the company’s reliability and professionalism.
A reputable piano moving company will utilize specialty equipment to protect your piano during transport. This includes a piano dolly, skid boards, and moving pads. Additionally, they should have a truck that is configured specifically for moving pianos. This will ensure that your piano is safe and secure during the moving process, and it will arrive at its destination in pristine condition.
If you are unsure about how to choose a piano mover, it is best to ask for recommendations from friends and family members. They will be able to give you an honest opinion of the company’s services and will help you make an informed decision. Alternatively, you can use an online platform like uShip to find a reputable piano mover that will meet your needs.
Equipment
Pianos are large, heavy instruments that require special handling techniques. Even the smallest mistake can damage the internal components and leave your prized possession unplayable. Using the services of a professional piano mover will reduce your risk of damage and ensure that your instrument arrives at its new home in perfect condition.
Whether you’re moving an upright or grand piano, the right equipment is essential for safe and efficient transport. An experienced piano mover will have a variety of tools and supplies to protect the instrument and make the process easier. You should also look for a company that carries insurance to cover any unforeseen accidents during transit.
Some of the most important equipment for moving a piano includes a piano dolly and a ramp to load and unload the instrument from the truck. A piano dolly has four heavy-duty wheels that are designed to support the weight of the instrument and roll it along the ground easily. It’s essential to choose a dolly that can handle your specific piano’s size and weight. A tilt-back dolly is useful for navigating tight spaces like doorways and staircases.
Another crucial piece of equipment is a set of high-quality straps and harnesses. These will secure the piano to the dolly or board, reducing movement and preventing any accidental damage during transit. Finally, padded covers and blankets will provide extra protection for your piano from scratches and dents during the move.
In addition to specialized equipment, you’ll need a truck with the capacity to accommodate your piano and other items. Ask your prospective piano movers about their equipment and truck capacities, and be sure to verify that the vehicle is equipped with a ramp for loading and unloading.
Lastly, it’s a good idea to prepare your home for the move before the actual move begins. Trim any overhanging branches and remove furniture or other objects that could interfere with the piano’s path through your home. Also, if your concrete steps or sidewalks are in poor condition, consult with a concrete professional to have them reinforced or replaced as needed.
Insurance
When selecting a piano mover, it’s important to consider not only their experience and reputation, but also their insurance coverage. Ensure your movers are fully insured and provide comprehensive coverage for damage or loss to your piano during the relocation process. This safeguards against any unforeseen accidents or damage that may occur, and protects your investment in the event of an incident.
While it is possible to save money by hiring uninsured movers, the cost of repairing or replacing a damaged piano may far exceed any initial savings. Additionally, inexperienced movers may not be familiar with proper techniques and equipment for moving a piano, increasing the risk of injury to themselves or damage to your home. Furthermore, specialized equipment for handling a piano is often required, adding to the cost of your move.
Insurance offers peace of mind that your piano is protected throughout the relocation process, reducing stress and anxiety. A reputable piano mover will be able to explain the various insurance options available and advise you on the best policy for your specific needs.
There are several insurance coverage options for pianos, including limited liability coverage and declared value coverage. Liability coverage provides basic protection for a fixed amount per pound of the piano’s weight, while declared value coverage provides more extensive coverage that can reimburse you for the repair or replacement of your piano.
When choosing a piano mover, ask for references or read online reviews and testimonials to gauge the company’s reliability. A trustworthy company will be happy to provide a list of satisfied customers who can vouch for their services. In addition, they will be able to provide detailed quotes for labor, transportation and equipment usage, with no hidden fees.
A professional piano mover is a must for your next relocation, as they are equipped with the necessary tools and expertise to transport your instrument safely. By taking the time to evaluate your options carefully, you can select a reputable piano moving service that will offer unparalleled value for your investment. In addition, by ensuring that your chosen movers are insured and bonded, you can rest assured that your piano is in good hands throughout the relocation process.
Safety
Pianos are delicate and heavy instruments that require special handling techniques to prevent damage. A professional moving company follows a process that guarantees the safety of both your piano and your property. This includes planning the move, securing proper equipment, and executing the logistics of the relocation. It is also important to choose a reputable company with a track record of satisfied customers. Testimonials can provide insight into a piano moving company’s level of expertise and commitment to quality.
Piano movers plan the logistics of your move and assess the space to identify potential risks. They measure doorways, hallways, and stairwells to determine adequate clearance for the instrument. They may also remove doors from hinges and clear furniture, rugs, and decorative items that might obstruct movement.
The moving team carefully wraps the piano in protective padding and secures it firmly during transit. This mitigates the risk of scratches, dents, and other forms of damage that can compromise the piano’s value. In addition, the movers transport your piano in climate-controlled vehicles to ensure stable temperatures and humidity.
When navigating stairs, the piano movers ensure that the instrument is securely strapped to a dolly and placed on the bottom step. They assign one mover to guide the dolly from the front (lower end) and at least two movers to lift from the back (upper end), providing the force needed to navigate the staircase. By maintaining visibility and communication, movers avoid injuries to themselves or the instrument.
In the event of an unexpected obstacle, the movers must be quick to respond and adapt their strategy. This could mean taking a different route, removing doors, or temporarily placing the piano down to reassess the situation. By responding quickly and accurately, movers minimize the risk of injury to themselves or the piano.
Concrete steps and sidewalks must withstand significant weight during a piano move, so they need to be in good condition. Regular maintenance by concrete professionals such as Wohlwend can strengthen these structures and reduce the chance of damage during relocation. A well-maintained concrete surface also provides a safer environment for everyone involved in the move, from delivery personnel to family members.
Commercial Roofing Options
Orlando Roofing Companies protect businesses and their contents from the elements. It’s one of the most important investments a business can make.
While all roofs serve the same purpose, there are many differences between residential and commercial roofing. The installation process and the materials used differ. The main difference is the slope of the roof and the material chosen.

When building owners and architects look for commercial roofing options, single-ply membranes have gained much popularity in recent years. They are ideal for flat or low-slope roofs and come in a wide range of styles, materials, and technology.
When a builder or owner opts for this type of roof, they can choose from three primary types of membranes: EPDM, PVC, and TPO. The difference between these membranes lies in their chemical composition, manufacturing process, and installation methods.
The membranes themselves can be either self-adhered or mechanically attached. Self-adhered is preferred by most installers because it enables the membrane to be installed quickly and with little mess or odor. It also offers the most durability of all installation methods because the adhesives bond securely to the surface of the roof deck. Mechanically-attached membranes, on the other hand, are fastened to the roof with lines of fasteners that are hidden within the seams where the sheets overlap. These fasteners are typically metal or plastic and are bonded to the membranes using hot air or solvents.
Regardless of the style, all single-ply membranes offer a variety of benefits that make them popular for commercial roofing projects. They are able to reflect and repel ultraviolet radiation that can otherwise damage the interior of a building, allowing you to maintain a cool roof that will save on energy costs. Single-ply membranes are also incredibly durable, standing up to even the harshest of weather conditions and environmental factors.
Another significant benefit is the ease with which they can be installed over existing roofs. Unlike built-up systems with multiple layers of bitumen and reinforcement felts, single-ply membranes can be rolled out and adhered to the existing surface, making them easy to install on a tight deadline.
In addition, many single-ply membranes can be installed over a broad spectrum of insulation materials. This is especially true for TPO and PVC, both of which can be applied over various forms of rigid or spray-applied insulation. This allows you to save on the cost of having to add a new insulation layer and also makes it easier to achieve your desired roof design, such as a green or energy-efficient roof.
All single-ply membranes, including PVC and TPO, are available in a wide variety of colors to match the aesthetic of any building. They are also lightweight, allowing them to be easily installed by professional contractors with minimal impact on the overall construction schedule.
All responsible membrane manufacturers provide installer training, ensuring that their products are installed properly and to industry standards. These companies often have field engineers who visit job sites during and after the membranes are installed to ensure that all work is done correctly. These specialists can also provide technical support for any installation issues that may arise during the project.
The two most popular single ply membranes are Polyvinyl Chloride (PVC) and Thermoplastic Olefin Membrane (TPO). Both offer the durability, energy efficiency, and other advantages that commercial buildings need. Both can be used as part of a roof restoration system or installed as an entirely new roofing system. Both can withstand the elements, chemicals, and other potential contaminants. They also provide an easy-to-maintain surface for the long term.
PVC and TPO are similar in their composition, but they have some distinct differences that should be considered when choosing the right roofing material for your building. Both are thermoplastics, which means they soften when heated and harden when cooled. This makes the seams in the roof membranes easily welded, creating a watertight, seamless top layer.
Both PVC and TPO are highly reflective of the sun’s rays, helping to keep your building cooler and potentially reducing your energy costs for air conditioning. They also offer a high level of UV resistance and have been tested to meet the standards set by Underwriters Laboratories and Factory Mutual.
TPO is a relatively new membrane that has gained in popularity over the past decade or so, thanks to its cost-effectiveness and performance. Its use has increased rapidly, with it now accounting for 40% of all new roof installations and 30% of reroofing projects. TPO is made from a blend of polypropylene and ethylene-propylene plastics, as well as other ingredients like plasticizers, UV absorbers, color pigments, biocides, flame retardants, and more.
While TPO may be less expensive than PVC, its quality can vary significantly from manufacturer to manufacturer. Some TPO membranes are susceptible to early deterioration and can experience weld problems, which can lead to premature failure. Others are prone to bubbling or rippling, and may have low breaking strength.
PVC, on the other hand, offers superior durability and longevity. Its initial cost is higher than TPO, but it has been a staple of the roofing industry for longer and has a proven track record of success. PVC is non-reactive to most chemicals and is able to withstand heat, oil, and exhaust from grease traps.
Ultimately, it is your roofing expert who can help you determine which type of single-ply membrane will best suit the needs of your commercial building. A professional will consider the building’s purpose and physical location, as well as your budget, before making a recommendation. Regardless of which material you choose, ensure your roofing contractor provides top-tier warranties to protect your investment and give you peace of mind. A qualified roofer will be backed by a reputable manufacturer and can help you understand the coverages of these warranties. This will help you avoid any issues that could arise during the course of your project. This will include both workmanship and material warranty periods.
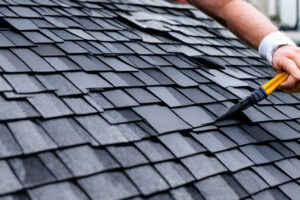
Shingles aren’t for every commercial building, but when they are a good fit, they provide many advantages. They’re easy to install and repair, and they add a design element that makes a business more appealing. Plus, they can help dampen the noise from rain and hail. In addition, shingles are more resistant to certain elements like UV rays and fire.
The type of shingle you choose will depend on your budget and aesthetic preferences. Builder-grade asphalt shingles offer budget-friendly options starting at $3 per square foot. Higher-end architectural shingles that feature enhanced wind protection, algae resistance and a warranty may cost more, but they typically last longer.
A shingle roof needs regular maintenance and periodic inspections to ensure that all components are working as they should. However, the small shingle size means that this maintenance is more involved than with other types of roofing. The shingles must be kept free of debris and debris accumulation, such as leaves and twigs, and also checked for water leaks, damage to the underlayment, and moss growth.
The small granules that make up a shingle’s surface are also an excellent deterrent to hail, sand and other forms of debris that can cause roof damage. Additionally, a shingle’s texture helps camouflage dirt and grime, making cleaning up much easier than it is on smooth metal or membrane roofs.
In general, a shingle roof requires less maintenance than other types of commercial roofing, but it is important to make sure that it’s done by a professional. A professional will check the roof for damage, leaks, and moss and lichen buildup. The roofing expert will also make sure the proper underlayment and ice and water shield are in place.
If you’re considering a new shingle roof for your commercial property, be sure to ask about the variety of colors and textures available. You can choose from a wide range of architectural styles and even have your roof designed to mimic the look of a natural slate tile roof.
There are a variety of other roofing materials out there, including rubber, PVC, and TPO. These are all durable and resistant to extreme weather conditions, but they may not be the right choice for your business. Talk to a commercial roofing contractor in to learn more about your roofing options and what the best fit is for your property. With the right installation and routine maintenance, your shingle roof will continue to protect your business for years to come.
Types of Roofing Materials
There are a wide variety of roofing materials to choose from. You can find one that suits your climate and accentuates the style of your home.
Regardless of the type you select, accurate roof measurements are essential. Anderson Roofing and Exteriors will help you determine how many shingle bundles you need. You can also use this information to estimate costs and budget for your roofing project.
Asphalt shingles are the most common type of shingle on homes. They are available in various colors and styles, allowing homeowners to create a roof that complements their home’s design and architecture. These shingles are also durable and can withstand high winds and heavy snowfall. They also provide excellent insulation, which helps to lower energy bills.
There are two basic types of asphalt shingles: fiberglass and organic. Fiberglass shingles have a base mat made of paper, waste material, cellulose, or wood fibers saturated with asphalt and covered with granules. Organic shingle base mats are usually made of recycled materials and contain up to 40% more asphalt than fiberglass shingles. This makes them more pliable and resistant to fire damage, and they offer a better class B FM fire rating than fiberglass shingles.
Both kinds of shingles have a lifespan specified by their manufacturer. 3-tab shingles live the shortest, while architectural and luxury shingles can last up to 30 years or more under the right conditions.
While there are some advantages to using asphalt shingles, these shingles do require some maintenance and upkeep. They need to be checked regularly for moss and algae growth and replaced as required after severe weather. Additionally, asphalt shingles are less environmentally friendly than other roofing materials since they are manufactured from petroleum and fiberglass.
The good news is that more manufacturers are producing energy-efficient versions of these shingles, so getting the benefits of an asphalt roof with less environmental impact is possible. Many of these shingles are made with reflective materials that help to reduce the amount of heat the shingles absorb from the sun.
Regardless of which type of shingle you choose, it is important to have the right number and quality to protect your home. The best way to ensure you have enough shingles is to ask your roofing contractor for advice on how much shingle area you need. They can also advise you on the best shingle types for your area and climate.
Wood shingles provide a rustic, cottage-esque aesthetic to a home. Though they’re not as well suited for rainy climates as other roofing materials, well-cared-for wooden roofs can last for decades. Some homeowners enjoy how they fade over time, giving their home a weathered look that adds charm.
Depending on the region, different types of wood are used for roofing and siding. The most popular type of wood shingle is cedar, with wallaba and teak being common choices. Cedar and wallaba shingles offer a timeless appeal, while teak adds a more exotic flavor to homes with a contemporary style.
A wood shingle can be sawn or split, offering a more rugged, natural appearance. Shake shingles can be hand split or sawn, and the finished product can be left rough on one side (handshake) or sawn on both sides for a more tailored look (taper sawn). A high-quality shingle should be cut perpendicular to the tree’s growth rings.
Its color and grain pattern can further distinguish the quality of a wooden shingle. Colored shingles are often stained or treated to enhance their durability. However, the appearance of a shingle will be more affected by the climate, installation quality, and maintenance schedule.
While they’re a beautiful choice for many regions, wood shingles require more upkeep than roofing materials. They must be treated annually to maintain their water and fire resistance and should be cleaned at least once a year. They’re also heavier than other shingles, making them unsuitable for some structures.
Slate is an alternative to wood shingles, offering the same elegant, old-fashioned look that many homeowners desire. Slate is extremely durable and weather-resistant, and it’s not uncommon for a well-maintained slate roof to last for a century or more. While it’s more expensive than a wooden shingle, it can save money in the long run by lowering energy costs. Slate is not as easy to install as other shingles and must be carefully cut by a skilled tradesperson. It is also a heavy material to ship and transport.
Clay roof tiles are an old-fashioned roofing material that can add a rustic charm to any home. They are usually associated with Spanish architecture but can be used on other styles of homes. They are highly durable and energy-efficient. They help keep heat in the house during warm and out during cold weather, lowering your heating and cooling bills. They also protect against rain, frost, wind, and the sun’s UV rays. Unlike asphalt shingles, they do not lose color and can last decades.
A clay tile roof is more expensive than an asphalt shingle roof, but it is worth the investment in terms of increased home value. This type of roofing is a good choice for homeowners who want to build a new home or are redoing their current roof. Finding a roofing contractor with experience installing clay tile is important. It is best to hire a pro who has worked on several different types of houses or historical buildings.
Concrete roof tiles are another good alternative to asphalt shingles. They are available in various colors and patterns to match any architectural style. They are also easy to maintain and add a unique look to any home. They are a great choice for people in hot or humid climates, as they can resist mold and mildew better than asphalt shingles.
While it is possible to install a concrete roof on a home with an existing structure, it is better to rebuild the entire roof with this type of roofing to achieve its maximum potential. This is because the existing roof may not be able to support the weight of the tiles. Replacing wood shingles with cement is also recommended, as they are more fire-resistant than wooden ones.
While clay tiles are more durable than other roofing materials, they can still deteriorate with age. This can lead to structural damage, so it is crucial to have your roof regularly inspected and repaired.
Slate is one of the most beautiful roofing materials available, and it has a natural, timeless appeal that complements classic homes from the 19th century and modernist houses built in recent years. Its beauty is only surpassed by its durability and longevity, however. It can last a century or more when it is properly maintained, and it can also add tremendous value to a home.
While it can be expensive, slate is an excellent investment, providing significant savings over the roof’s life. However, it is important to select the right roofer for the job. Slate is heavier than asphalt shingles, requiring a special skill set not all roofers possess. If a roofer is not experienced with working with slate, mistakes can be made that will be costly to correct.
In addition, slate is sensitive to temperature changes and must be installed correctly to prevent damage. Roofers unfamiliar with these issues can cause problems requiring a roof replacement or repair much sooner than necessary.
Most slates are cut into standardized shingle sizes, but they can also be cut into different shapes to form geometric patterns and create other designs. These patterns can add texture to a house and even serve as a way to hide an unsightly chimney or vent.
While slate is a good choice for homeowners interested in a more traditional look, it is also possible to use synthetic slate on modernist buildings and homes. Synthetic slate is manufactured from petroleum-based materials and cast from authentic slate, and it can be recycled as a roofing shingle at the end of its useful life. Most synthetic slates are produced with non-toxic, environmentally friendly materials and contain advanced ultraviolet inhibitors to reduce wear.
How to Keep Your Roof Repair Cost Down

It’s no secret that Roof Repair can be expensive. However, there are some things you can do to keep the cost down. For example, you can repair minor leaks with Gorilla Tape (which is specifically formulated to stick to wet surfaces). You should also handle problems quickly, as even small leaks can cause major water damage over time.
Cost of Materials
Your roof protects the inside of your home, but it’s vulnerable to damage and requires regular maintenance. Some repairs are minor, while others can be expensive. The cost of materials plays a large role in the overall cost of the repair. The type of roofing material affects costs as well. Flat and single-story gable roofs are the least expensive to repair, while curved or multiple-level roofs can be more costly. The pitch, or steepness, of the roof also increases repair costs. Steep roofs require extra safety precautions and take longer to work on, which raises labor costs.
Surface problems like a few broken or missing shingles and leaky skylights are relatively inexpensive to fix. Minor repairs include applying roofing cement or caulking and replacing the flashing, which are the thin metal pieces that line roof valleys and prevent leaks around chimneys, vents, and skylights. If the underlying sheathing or rafters are damaged, a roof truss repair may be necessary. These are the interior wooden supports that form the “skeleton” of your roof, and they can be vulnerable to moisture, insect infestations, rot, or structural damage.
Leaks are one of the most common reasons homeowners contact a roof contractor. The size of the leak and how long it has been occurring will determine the repair cost. If there is a lot of water penetration, a new roof overlay or partial replacement may be required. Other costly leaks stem from faulty installations, loose seams and fasteners, ice dams, weathered coatings, or corrosion of the flashing.
Repairing a metal roof starts at $250 for patching holes and resealing, and can reach up to $800 for a complete roof overlay or partial replacement, according to LawnStarter. This price includes painting and removing any existing rust, as well as cleaning and inspecting the underlayment for corrosive substances.
The condition of your gutters can also affect the total cost of a repair, with repairs ranging from $150 to $500 per section. A professional inspection is usually recommended, and can run $100-$600. This is an essential step to ensure the health of your roof and avoid costly issues in the future.
Cost of Labor
The cost of labor used to repair a roof depends on the extent of the damage and the complexity of the repairs required. It also depends on the time of year, since roofing contractors are in higher demand in spring and summer. The type of roof material is another factor, since some materials are more difficult and expensive to work with than others. Other factors include the type of repair needed and the roof’s pitch and design.
Minor roof repairs usually involve patching holes, repairing leaky skylights and fixing cracked vents. These types of repairs can be done by homeowners who have some experience with construction or who are comfortable using power tools and caulking. They typically cost less than repairing a section of the roof.
Leaking roofs are the most costly to fix, especially if there is extensive damage or mold growth. Depending on the type of roof and extent of the leak, it may require removing shingles, installing new flashing or replacing entire sections of the roof. It may also require re-sealing the valleys on the roof or replacing the gutters.
Another common problem is sagging roofs, which often result from a buildup of snow or water that weighs down the shingles and boards beneath them. If the sagging is isolated, it may not require a complete replacement and can be fixed by simply raising the shingle in question.
If the sagging is widespread, however, it could require structural reinforcements that are more expensive and time-consuming to install than simply raising the shingles. Also, if the sagging is caused by a significant number of blown-off shingles, it will probably be more cost-effective to replace the entire roof.
A roof’s structure is largely made of wood, and the rafters and sheathing can be damaged by pests or from old age. Damaged rafters and sheathing can cause the roof to sag or even collapse.
Other structural issues that can be expensive to fix include the ridge capping, which is the triangular area at the top of a roof and often needs to be replaced, as well as the eaves, which are where the walls of a home meet the roof.
Cost of Permits
When it comes to building permits, costs vary from city to city. However, most cities have a standard plan check fee and additional fees and taxes for each project. This allows the city to assess the cost of materials, labor and other factors that go into the building or renovation process. This means that it’s important for homeowners and contractors to check with the city before starting any work on a project and to know the specific guidelines and costs of working with that particular jurisdiction.
A permit is typically required to repair or reroof a roof. The roofing contractor is responsible for securing the permit before beginning work and notifying the city when the work has been completed. The city then inspects the work to ensure that it meets all of the proper codes and regulations. The city inspector can also verify the quality of the workmanship, which is an important factor when it comes to repairing or reroofing a home.
If you don’t get a permit for your roof repair, there could be consequences. For example, the building inspector might order you to stop working until you get the permit or they may require you to remove any work that has been done without a permit. This is not good for the health and safety of you and your family, so be sure to always ask a roofing company if they will be getting a permit before hiring them for any work.
The cost of a permit will depend on the size of your roof and the type of repair being performed. In general, the cost of a permit will be higher for larger projects and repairs that require structural changes. If your roof is leaking and you need to repair a small area of the roof, it’s generally not viewed as structural damage by the building department and doesn’t require a permit.
In addition, many insurance companies will not cover any damage that was caused by a home owner who did work on their home without a permit. It’s therefore vital to obtain a permit for any repair or reroofing job to avoid issues with insurance coverage in the future.
Cost of Emergency Repairs
The roof is your home’s first defense against the elements. It keeps out rain, wind, cold, and pests. It’s important to maintain a properly functioning roof, but sometimes repairs are necessary. Whether it’s a tree limb that crashes into the roof or a severe leak, these types of emergency repairs need to be fixed quickly to minimize damage and protect your home.
Roof repair costs vary depending on the type and severity of the repair. A simple leak repair might cost $150, while more serious issues could run up to $1,500 or more. The roof material also affects the cost. Asphalt shingles are the cheapest roofing materials, while metal and slate are more expensive. A full roof replacement can cost $8,000 or more.
Some repairs require a permit, which will add to the overall cost of the project. Generally, permits cost $75-$250, and a professional inspection will be required for most major work. The inspection will help determine the exact nature of the work that needs to be done.
Another factor that will increase the cost of a roof repair is the time it takes to complete the job. A good roofer will try to complete the work as quickly as possible without sacrificing quality. However, weather and other unforeseen circumstances can make this difficult.
It’s a good idea to set aside some money for emergency roof repair projects. Even if you have routine maintenance performed by a professional, it’s still a good idea to have some money set aside in case of an emergency. If you do decide to undertake emergency roof repair yourself, remember that it is not recommended to climb onto a damaged roof unless you have the proper equipment and training. Not only is this dangerous, but it can also result in additional damage to your home and possibly injury or death. It’s always best to have a professional inspect the damage and perform the emergency work. This will ensure that the job is completed correctly and safely. A reputable roofer will also be able to assist you with filing an insurance claim.
The Benefits of Chimney Repair
Chimney repair is a crucial part of keeping your home safe. It can prevent leaks, a dangerous buildup of carbon monoxide gas, and even house fires.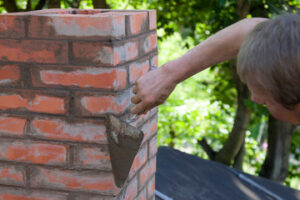
There are several types of chimney repairs that require expert attention, including cracks, repointing, and spalling. These problems can lead to expensive and extensive repairs if left untreated.
A chimney flue liner is one of the most important parts of a chimney. It helps to protect the interior of your chimney from damage and ensures that smoke, ash, and other byproducts can safely escape to the outside.
Chimney liners are also essential for limiting the amount of heat that transfers to combustible materials around your home. A National Bureau of Standards (NBS) study found that woodwork adjacent to an unlined chimney would catch fire within 3.5 hours.
If your chimney liner is damaged or deteriorating, you need to have it repaired as soon as possible so that you can continue using your fireplace or stove. If the damage is too severe, you may have to replace your entire chimney.
There are a few different ways that chimney liners can be repaired. Some options include repairing cracks, relining, and replacing the entire liner.
Relining a chimney involves the removal of the original tile flue liner and inserting a new one. A qualified chimney technician can use a specialized tool to remove the existing flue liner and replace it with a new, properly sized one.
The new chimney flue liner should be about a third of the size of the original. This will allow the chimney to draft properly and meet the International Residential Code requirements for flue size.
Stainless steel flue liners are often the most common type of liner, and they are designed to withstand exposure to a chimney fire for a long period of time. Unlike clay liners, metal liners are easier to replace when necessary.
A relining technician will determine the best relining method for your specific needs, but most often it will involve removing the old liner and inserting the new one. Then, any insulation that is needed will be added to keep the new liner warmer and reduce heat transfer to the surrounding masonry.
Relining your chimney can be costly, but it can help to prevent the need for replacement and make your chimney more effective. It can also help to increase the life of your chimney and reduce the risk of future problems. Regardless of the repair method used, it is important to get your chimney inspected regularly by a qualified chimney professional.
If your chimney has been leaking, you need to call in a professional. This is because water leaks from a chimney can lead to mold, rot, and other structural issues that can cost thousands of dollars in repairs.
When you are a homeowner, it is important to make sure that your home and its structures are in good condition. This includes making sure that your roof is in good shape, your gutters are clear and free of debris, and that your flashing around the chimney is in good condition.
The flashing is an area of roofing that closes the gap between your chimney and your roof shingles. It is made of aluminum or copper and should be in good condition to help protect your chimney from water damage.
A roofer should be able to repair the flashing and replace it with new material. They will also make sure that the flashing is secure and airtight against your chimney so that it can hold back moisture from seeping in.
It is common for people to try to seal cracks in their chimneys with caulk or tar, but this does not always work well. This is because caulking can easily wear away and allow water to get into your chimney.
Another common cause of a chimney leaking is cracked flue tiles or mortar joints. These can be difficult to repair. You may have to tear off the entire flue tile in order to do this, but it is worth it for the long-term health of your chimney.
In addition to allowing water to enter your chimney, these cracks can also make it more likely for pests to get inside. Rodents are known to travel along roofs and will not hesitate to take up residence in your chimney if they can find a way in.
If your chimney is leaking because of cracked masonry, you will need to contact a chimney services professional to inspect the masonry and fix the problem. The best time to do this is when the weather is dry.
You can also hire a chimney services professional to install a chimney cap that will prevent rainwater and other debris from entering the chimney. A chimney cap is an essential part of any home and can save you a lot of money in the long run.
A leaning chimney is a problem that many older homes suffer from. It may not seem like a major issue at first, but it can cause serious damage to your home and threaten the safety of you and your family.
A chimney is one of the heaviest elements in a home, and it can put a lot of stress on your foundation when it begins to lean. Fortunately, there are several ways to repair your leaning chimney and ensure its stability.
The most common method is to install foundation piers. These piers are driven under your chimney until it reaches a stable soil base. Once the piers are in place, they support the chimney and stabilize it permanently.
Another option is to install helical piers. These piers are made of steel and are driven under the chimney until it reaches a good soil base. The piers are then held in place with brackets.
Once the piers are in place, a hydraulic jack can be used to slowly raise the chimney back to its original position. This repair method is a permanent solution and prevents future problems from occurring.
In addition to putting the foundation at risk, a leaning chimney can also create a number of other issues that could potentially be dangerous. It can lead to a cracked liner which will let gases into your home, or it can cause water damage.
It can also allow unwanted insects into your home. Depending on the severity of your problem, a leaning chimney could even cause damage to your roof and other parts of your home.
If you suspect that your chimney is leaning, make sure you don’t try to fix it yourself. The chimney is a significant part of your home’s structure, and you need to call a professional to evaluate the problem as soon as possible.
Aside from the obvious dangers, a leaning chimney is also a visual nuisance and can be difficult to spot from the ground. Some homeowners attempt to correct the leaning by filling voids with foam or other sticky materials, which can only serve to make the situation worse.
The chimney is a major component of any home, and it can become a big eyesore or even cause damage if neglected. This is why it’s important to take care of a crumbling chimney before it becomes too much of a problem.
If you see crumbling bricks on the exterior of your chimney, it may indicate that the mortar holding them together is deteriorating and leaking. In some cases, this can lead to water damage and a whole host of other issues.
A masonry repair professional will examine the area and offer options for repairs. Some of these include tuckpointing the joints between the bricks, which will prevent the deterioration from continuing. Others may recommend waterproofing the bricks, which will make them more resistant to moisture.
Another common chimney repair method is to seal the flue liner. This helps prevent rust from developing and reduces the risk of chimney leaks, which can be a nuisance. The liner is also a crucial part of the chimney’s structure, so if it becomes damaged, it should be repaired immediately to protect the rest of the chimney.
You can also use clear painter’s caulk to repair damaged chimney brickwork. However, this type of repair is not permanent and will eventually break down due to sun exposure. A more permanent fix is to demo out soft mortar joints, remove cracked or spalling bricks, and repoint them using new mortar.
The mortar between the bricks of a chimney is essential to the structure’s integrity, and it will begin to deteriorate as soon as it becomes exposed to moisture. This can happen when water enters the crack between a brick and its mortar joint, freezes, expands, and then causes the entire structure to deteriorate.
Repeated freezing and thawing cycles can cause the mortar to deteriorate and damage the bricks. This can result in the formation of spalled and/or missing bricks that are unbalanced and can cause the chimney to tilt on one side or collapse altogether.